
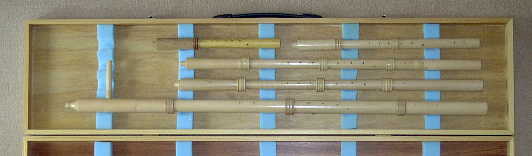
Another of my interests is early wind instruments. This is about fourth on my list of hobbies so doesn't get a lot of attention. I have recently been making a set of cornamusen. The picture shows a set of cornamusen (which are essentially straight crumhorns) consisting of a bass, two tenors, an alto and a soprano. They are made from sycamore apart from the soprano which is mainly of Pau Amarello with a windcap of oak (I just happened to have some bits lying around). The harder wood gives this instrument a brighter tone.
To hear these instruments click on the following. They are multitracked recordings the first two arranged for two sopranos, an alto and a bass, the third for an alto two tenors and a bass.
pav1.mp3 52k
sans1.mp3 53k
mag2.mp3 65k
The first difficulty was how to reliably drill the long holes for the bore. The following pictures show some drills that worked for me and some that didn't.
Drills that didn't work for me.
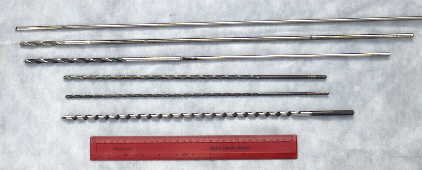
The top one is a shell auger for standard lamp boring which wandered. The second is cheap beam drill with a reduced shank. This wandered. The third is a good beam drill brazed onto some silver steel of smaller diameter. This wandered as soon as the reduced shank went into the wood. The next two are extra long series drills. These are very flexible drills and wandered. The last one is an extra long power auger bit. This is very flexible and wandered. The apparent spiralling on some of the drills is a photographic problem.
Drills that did work for me.
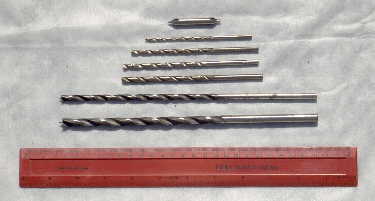
The top one is a centre drill and is used to start holes. The next four are standard long series drills and are very stiff. The last two are beam drills from Axminster. These are very stiff. Unfortunately they are only available from 6mm upwards and are only 240mm long. Good for the first part of holes.
Home made drills that did work for me.
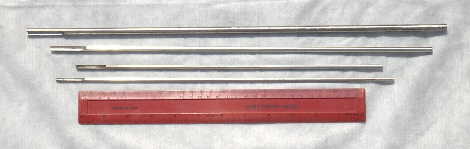
These are a couple of home made drills in sizes 3/16 inch, 5mm, 6mm and 8mm. These are good for making the cornamusen.
These home made drills are very similar to the well known D drills. The problem I had with D drills is that they did not withdraw the swarf. So I made these drills by milling a quadrant from the end of a piece of steel. The tip is then ground so that there is a leading edge much like a D drill. I call them C drills as the cross section at the tip is a bit like the letter C. The swarf gets packed into the quadrant and stays there as the drill is withdrawn. I prefer using stainless steel for these drills as it is hard enough to cut wood and doesn't go rusty in my damp garage although silver steel is just as good.
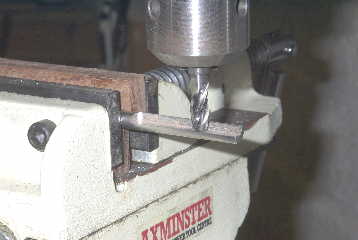
The following picture shows how I modified my pillar drill to mill the quadrant. A cheap cross vice from Axminster was used to hold and move the bar. This was bolted to the drill stand platter. It is not as good as a proper mill but is good enough for now.

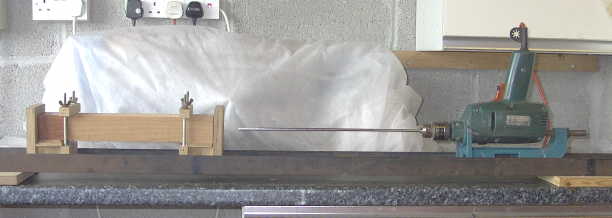
The wood lathe that I use is very crude and although it has the facility for through the tailstock drilling, the alignment is not good so a bendy hole is the usual result. The way I drill the bore is with a jig as shown in the following picture. The wood is clamped at one end of the jig and the electric drill mounted on a horizontal drill stand which can be slid up and down. The alignment is critical and the drill stand is shimmed to get this as close as possible. The drilling starts with a centre drill to get the starting hole aligned as close as possible with the chuck. A standard long series drill is then used. These drills are very stiff and will get the hole started accurately. Finally a C drill is used to drill the main part of the bore. Because the amount of swarf that can be collected by the drill is limited, the maximum cut the drill can make is only a couple of mm. This means the drill has to be withdrawn often to clear the swarf.
I do most of the outside turning on a 7 x 14 metal lathe (A bigger one would be better but they are so heavy) because I can't get the accuracy or finish by hand. Consequently most instruments are made in sections and glued together, not authentic maybe. I use the wood lathe for taking the corners off, sanding and adding any details.
Reeds and Bores
The reeds I used for these instruments are bought from the Early Music Shop, Yorkshire. I've had a try at making them from yoghurt cartons but that's a whole new ball game. The reed and bore sizes need to be matched as follows.
Soprano instrument using the Alto reed, 5mm bore.
Alto instrument using the Alto reed, 5mm bore.
Tenor instrument using the Tenor reed, 6mm bore.
Bass instrument using the Bass reed, 8mm bore.
If a bigger bore is used the reeds have a tendency to become unstable. Note the Soprano instument uses an Alto reed, I tried a Soprano reed using a both 4mm and a 3/16 inch bore but it wasn't as good.